八、Elasticsearch
【摘要】elasticsearch~![]()
Elasticsearch简介
https://www.elastic.co/cn/what-is/elasticsearch
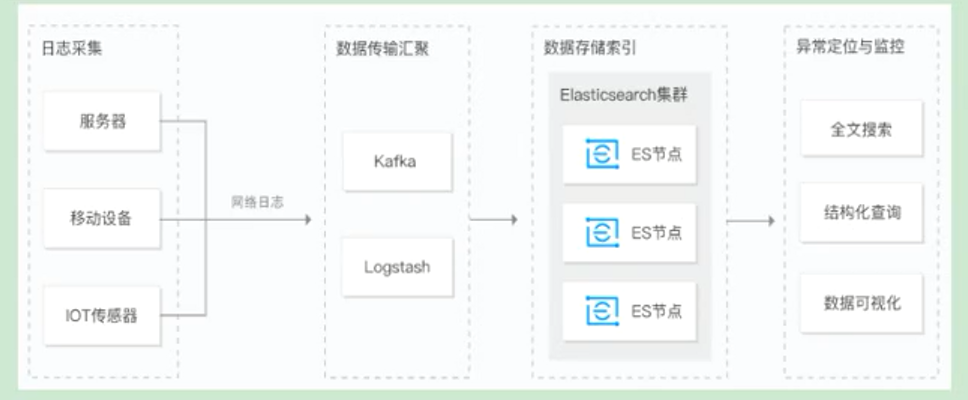
全文搜索属于最常见的需求,开源的Elasticsearch是目前全文搜索引擎的首选。
它可以快速地储存、搜索和分析海量数据。维基百科。Stack Overflow、Github都采用它。
Elastic的底层是开源库Lucene。但是,你没有办法直接用Lucene,必须自己写代码区调用它的接口。Elastic是Lucene封装的,提供了REST API的操作接口,开箱即用。
REST API:天然的跨平台。
官方文档:https://www.elastic.co/guide/en/elasticsearch/reference/current/index.html
官方中文:https://www.elastic.co/guide/cn/elasticsearch/guide/current/index.html
社区中文:http://elasticsearch.cn
基本概念
Index(索引)
动词,相当于MySQL中的insert;
名词,相当于MySQL中的Database;
Type(类型)
在Index(索引)中,可以定义一个或多个类型。
类似于MySQL中的Table;每一种类型的数据放在一起;
Document(文档)
保存在某个索引(Index)下,某种类型(Type)的一个数据(Document),文档是JSON格式的,Document就像是MySQL中的某个Table里面的内容。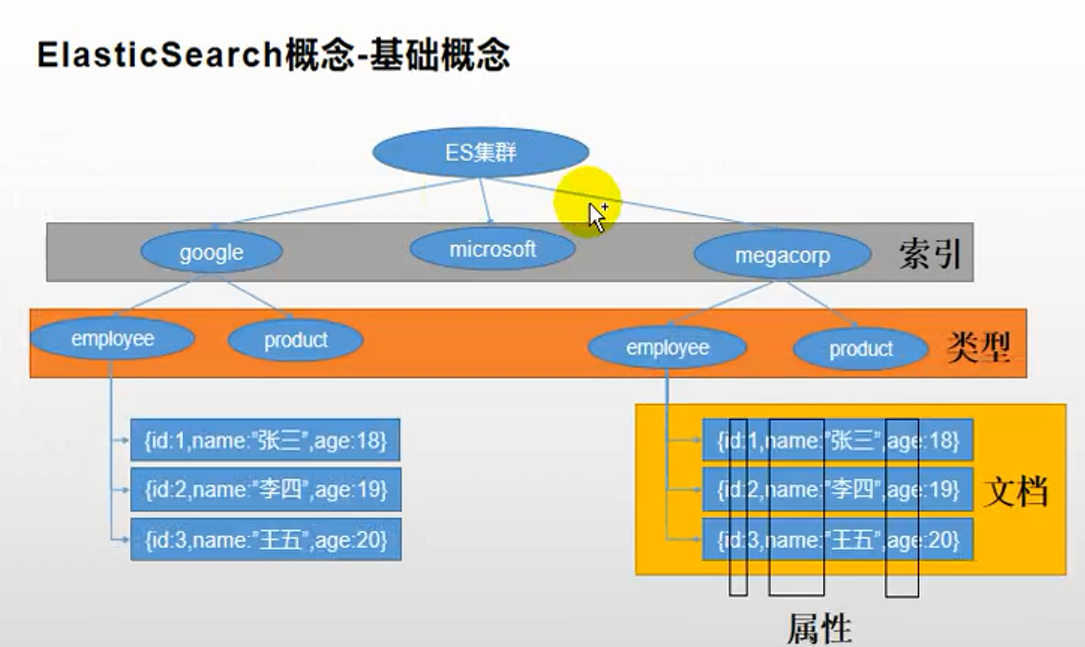
Docker上安装es
下载镜像文件
1 | docker pull elasticsearch:7.4.2 # 存储和检索数据 |
free -m 可以查看linux内存使用情况。
创建实例
Elasticsearch
1 | mkdir -p /mydata/elasticsearch/config |
以后在外面安装好插件重启即可。
特别注意:-e ES_JAVA_OPTS="-Xms64m -Xmx128m"测试环境下,设置ES的初始内存和最大内存,否则导致过大启动不了ES。
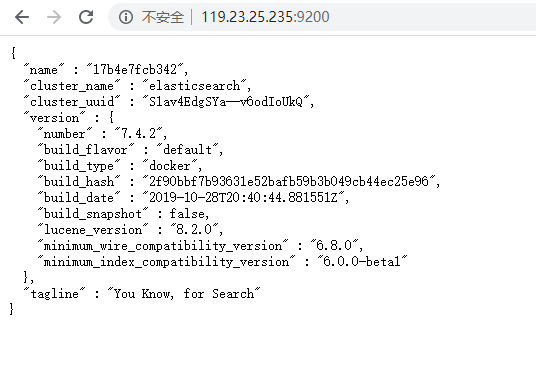
使用PostMan测试ElaticSearch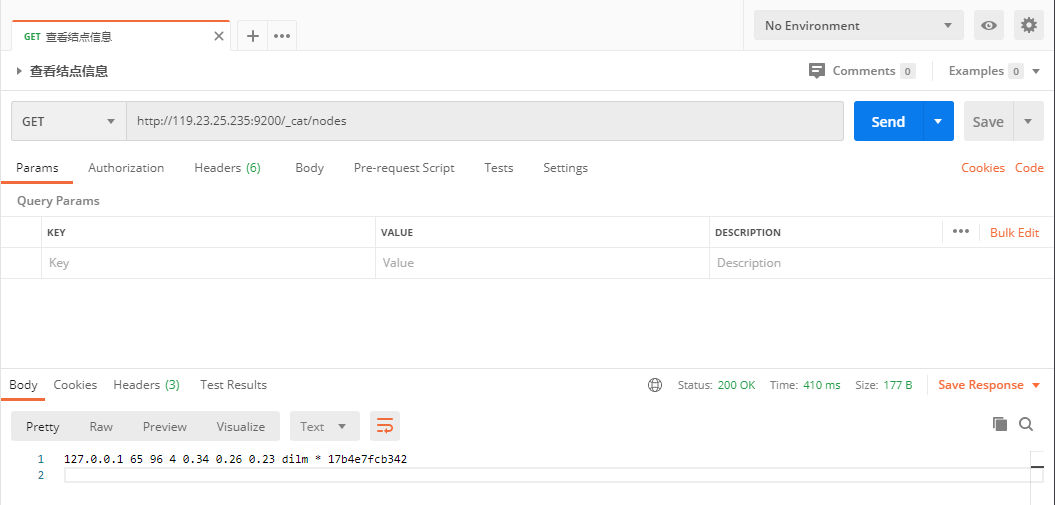
Kibana
1 | docker run --name kibana -e ELASTICSEARCH_URL=http://119.23.25.235:9200 -p 5601:5601 -d kibana:7.4.2 |
初步检索
_cat
GET /_cat/nodes :查看所有节点
GET /_cat/health :查看es健康状况
GET /_cat/master :查看主节点
GET /_cat/indices :查看所有索引 show databases;
索引一个文档(保存)
保存一个数据,保存在哪个索引的那个类型下面,指定用哪个唯一标识。
PUT customer/external/1 在customer索引下的external类型下保存1号数据为
1 | { |
PUT和POST都可以。
POST新增,如果不指定id,会自动生成id。指定id就会修改这个数据,并新增版本号。
PUT可以新增可以修改。PUT必须指定id,由于PUT需要指定id,我们一般都用来做修改操作,不指定id会报错。
查询文档
1 | GET customer/external/1 |
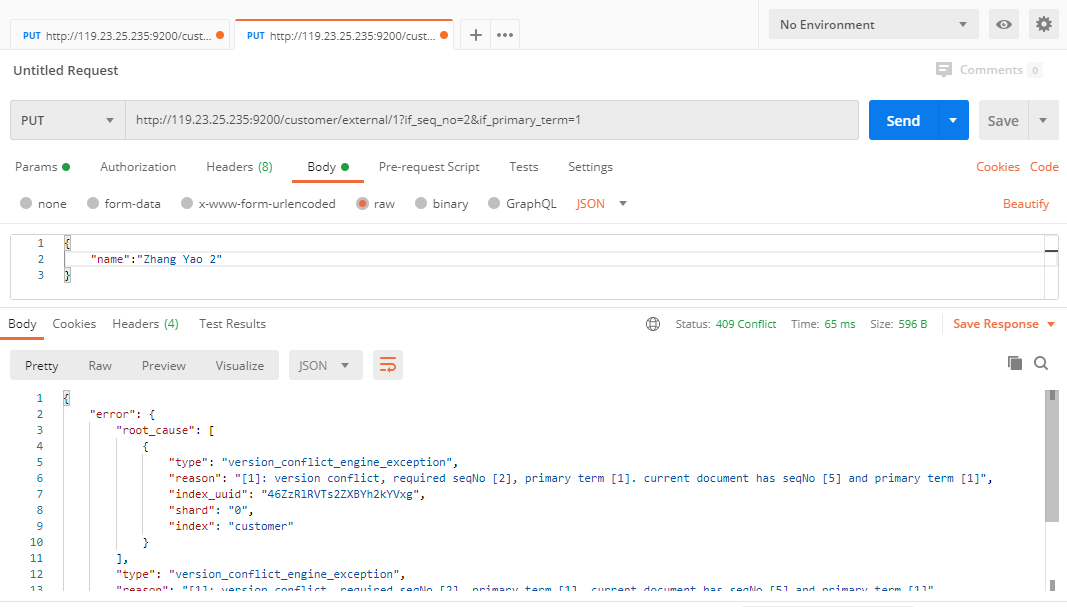
更新携带 ?if_seq_no=0&if_primary_term=1
类似MySQL中的乐观锁。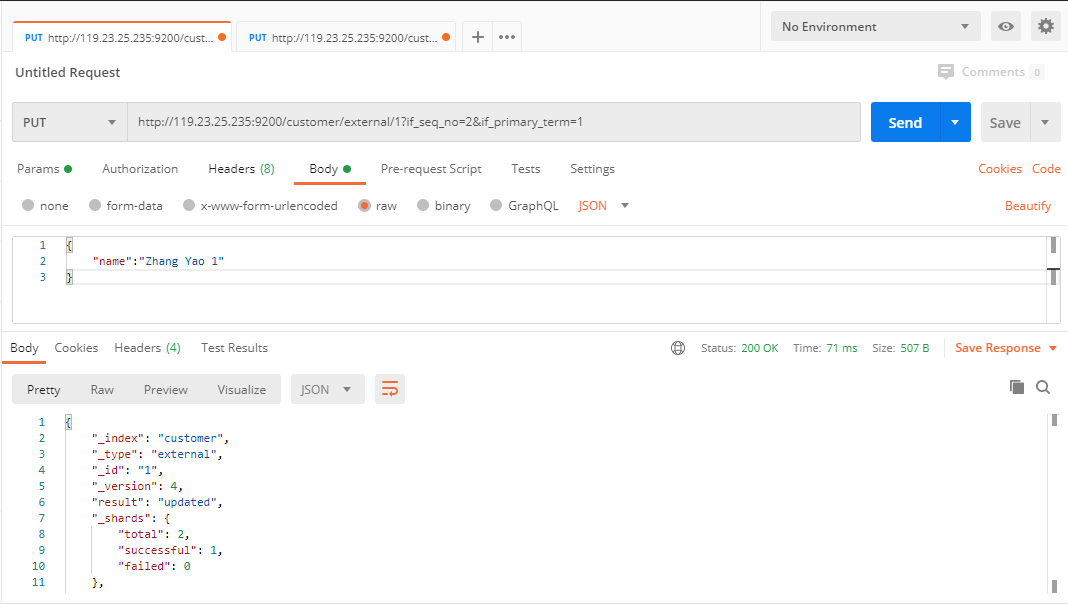
更新文档
1 | POST customer/external/1/_update |
或者
1 | POST customer/external/1 |
或者
1 | PUT customer/external/1 |
不同:POST操作会对比与源文档数据,如果相同不会有什么操作,文档version不增加;
PUT操作总会将数据重写保存并增加version版本。
带_updata对比元数据重新保存并增加version版本;
看场景:对于大并发更新,不带update;对于大并发查询偶尔更新带update;对比更新,重写计算分配规则。
更新同时增加属性
1 | POST customer/external/1/_update |
PUT和POST(不带_update)也可以。
删除文档&索引
DELETE customer/external/_bulk
DELETE customer
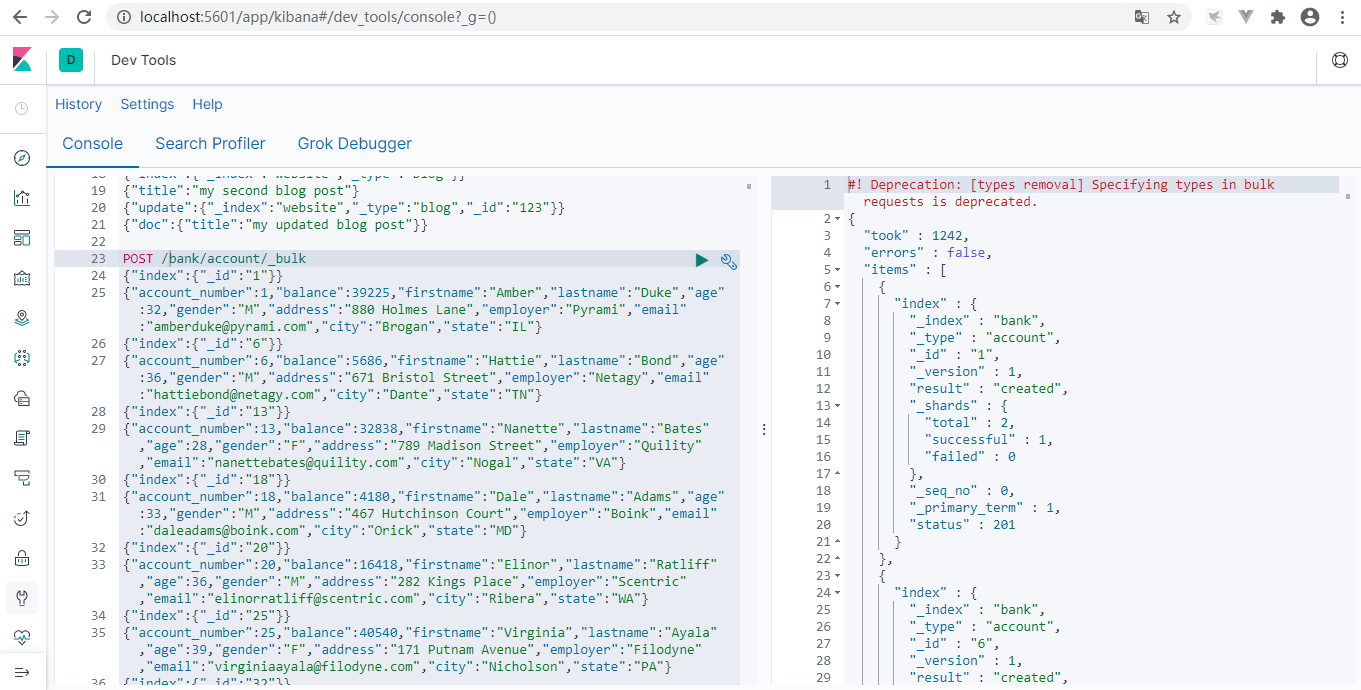
bulk批量API
1 | POST customer/external/_bulk |
样本测试数据
导入测试数据
POST /bank/account/_bulk
测试数据
设置es开机自启
docker update 17b4e7fcb342 --restart=always
进阶检索
SearchAPI
https://www.elastic.co/guide/en/elasticsearch/reference/7.x/getting-started-search.html
ES支持两种基本方式检索:
- 一个是通过使用REST request URI 发送搜索数据 (uri+检索参数)
- 另一个是通过使用 REST request body来发送他们 (uri+请求体)
检索信息
GET bank/_search?q=*&sort=account_number:asc
一切检索从_search开始
GET bank/_search:检索bank下所有信息,包括type和docsGET bank/_search?q=*&sort=account_number:asc:请求参数方式检索
响应结果解释:took– Elasticsearch执行搜索的时间(毫秒)time_out– 告诉我们搜索是否超时_shards– 告诉我们多少个分片被搜索了,以及统计成功/失败的搜索分片hits– 搜索结果hits.total– 搜索结果hits.hits– 实际的搜索结构数组(默认为前10的文档)_source– 结果的排序key(键)(没有则按score排序)_score和max_score– 相关性得分和最高得分(全文检索用)uri+请求体进行检索
1
2
3
4
5
6
7
8
9
10
11
12
13GET bank/_search
{
"query": {
"match_all": {}
},
"sort": [
{
"balance": {
"order": "desc"
}
}
]
}HTTP客户端工具(PostMan),GET请求不能携带请求体,我们变为POST也是一样的。我们POST一个JSON风格的查询请求体到_search API。
需要了解,一旦搜索的结果被返回,Elasticsearch就完成了这次请求,并且不会维护任何服务端的资源或者结果的cursor(游标)。
Query DSL
基本语法格式
Elasticsearch提供了一个可以执行查询的JSON风格的DSL(domain-specific language领域特定语言)。这个被称为Query DSL。该查询语言非常全面,并且刚开始的时候感觉有点复杂,真正学好它的方法是从一些基本的示例开始的。
- 一个查询语句的典型结构
1
2
3
4
5
6{
QUERY_NAME:{
ARGUMENT:VALUE,
ARGUMENT:VALUE,...
}
} - 如果是针对某个字段,那么他的结构如下:示例:
1
2
3
4
5
6
7
8{
QUERY_NAME:{
FIELD_NAME:{
ARGUMENT:VALUE,
ARGUMENT:VALUE,...
}
}
}1
2
3
4
5
6
7
8
9
10
11
12
13
14
15GET bank/_search
{
"query": {
"match_all": {}
},
"from": 0,
"size": 5,
"sort": [
{
"balance": {
"order": "desc"
}
}
]
}query定义如何查询match_all查询类型【代表查询所有的所以】,es中可以在query中组合非常多的查询类型完成复杂查询。
除了query参数之外,我们也可以传递其他的参数以改变查询结果。如sort和size。from+size限定,完成分页功能。sort排序,多字段排序,会在前序字段相等时后续字段内部排序,否则以前序为准。
返回部分字段
1 | GET bank/_search |
match[匹配查询]
基本类型(非字符串),精确匹配
1
2
3
4
5
6
7
8GET bank/_search
{
"query": {
"match": {
"account_number": "20"
}
}
}match返回account_number=20的。
字符串,全文检索
1
2
3
4
5
6
7
8GET bank/_search
{
"query": {
"match": {
"address": "mill"
}
}
}最终查询出address中包含mill单词的所有记录。
match当搜索字符串类型的时候,会进行全文检索,并且每条记录有相关性得分。字符串,多个单词(分词+全文检索)
1
2
3
4
5
6
7
8GET bank/_search
{
"query": {
"match": {
"address": "mill road"
}
}
}最终查询出address中包含mill或者road或者mill road的所有记录,并给出相关性得分。
match_phrase[短语匹配]
当需要匹配的值当成一个整体单词(不分词)进行检索。
1 | GET bank/_search |
查出addres中包含mill road的所有记录,并给出相关性得分。
multi_match[多字段匹配]
1 | GET bank/_search |
address或者city包含mill。
bool[复合查询]
bool用来做复合查询;
复合语句可以合并任何其他查询语句,包括复合查询,了解这一点是很重要的。这就意味着,复合语句之间可以互相嵌套,可以表达非常复杂的逻辑。
- must:必须达到must列举的所有条件。
- should:应该达到should列举的条件,如果达到会增加相关性的评分,并不会改变查询的结果。如果query中只有should且只有一种匹配规则,那么should的条件就会被作为默认匹配条件而去改变查询结果。
- must_not:必须补上指定的情况。address包含mill,并且gender是M,如果lastname里面有Wallace最好不过,但是age必须不是20。
1
2
3
4
5
6
7
8
9
10
11
12
13
14
15
16
17
18
19
20
21
22
23
24
25
26
27
28
29
30
31
32
33GET bank/_search
{
"query": {
"bool": {
"must": [
{
"match": {
"gender": "M"
}
},
{
"match": {
"address": "mill"
}
}
],
"must_not": [
{
"match": {
"age": "28"
}
}
],
"should": [
{
"match": {
"lastname": "Wallace"
}
}
]
}
}
}
filter[结果过滤]
并不是所有的查询都需要产生分数,特别是那些仅用于”filtering”(过滤)的文档。为了不计算分数Elasticsearch会自动检查场景并优化查询的执行。
1 | GET bank/_search |
term[结果过滤]
和match一样,匹配某个属性的值。全文检索字段用match,其他非text字段匹配用term。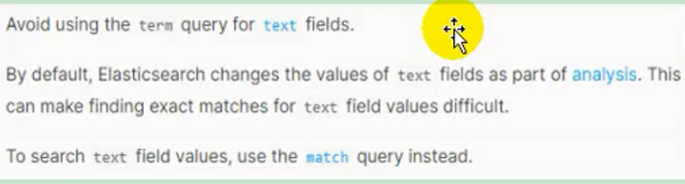
1 | GET bank/_search |
aggregations[执行聚合]
聚合提供了从数据中分组和提取数据的能力。最简单的聚合方法大于等于SQL GROUP BY和SQL聚合函数。在Elasticsearch中,您有执行搜索返回hits(命中结果),并且同时返回聚合结果,把一个响应的所有hits(命中结果)分隔开的能力。这是非常强大且有效的,您可以执行查询和多个聚合,并且在一次使用中得到各自的(任何一个的)返回结果,使用一次简洁和简化的API来避免网络往返。
搜索address中包含mill的所有人的年龄分布以及平均年龄,但不显示这些人的详情。
1
2
3
4
5
6
7
8
9
10
11
12
13
14
15
16
17
18
19
20
21
22
23
24
25
26
27
28
29
30
31
32
33
34
35
36GET bank/_search
{
"query": {
"match": {
"address": "mill"
}
},
"aggs": {
"ageAgg": {
"terms": {
"field": "age",
"size": 10
}
},
"ageAvg": {
"avg": {
"field": "age"
}
},
"balanceAvg": {
"avg": {
"field": "balance"
}
}
},
"size": 0
}
---------------
size:0 不显示搜索数据
aggs:执行聚合。聚合语法入下。
"aggs": {
"aggs_name 这次聚合的名字,方便展示在结果集中": {
"AGG_TYPE 聚合的类型(avg,term,terms)"{}
}
}ex:
1
2
3
4
5
6
7
8
9
10
11
12
13
14
15
16
17
18
19
20
21GET bank/_search
{
"query": {
"match_all": {}
},
"aggs": {
"ageAgg": {
"terms": {
"field": "age",
"size": 100
},
"aggs": {
"ageAvg": {
"avg": {
"field": "balance"
}
}
}
}
}
}复杂:按照年龄聚合,并且请求这些年龄段的这些人的平均薪资
1
2
3
4
5
6
7
8
9
10
11
12
13
14
15
16
17
18
19
20
21
22
23
24
25
26
27
28
29
30
31
32
33GET bank/_search
{
"query": {
"match_all": {}
},
"aggs": {
"ageAgg": {
"terms": {
"field": "age",
"size": 100
},
"aggs": {
"genderAgg": {
"terms": {
"field": "gender.keyword"
},
"aggs": {
"balanceAgg": {
"avg": {
"field": "balance"
}
}
}
},
"ageBalanceAvg": {
"avg": {
"field": "balance"
}
}
}
}
}
}
Mapping
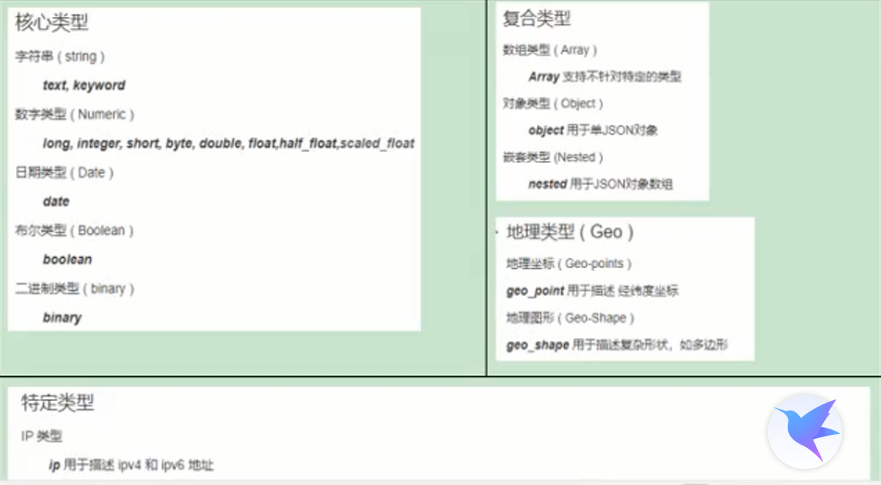
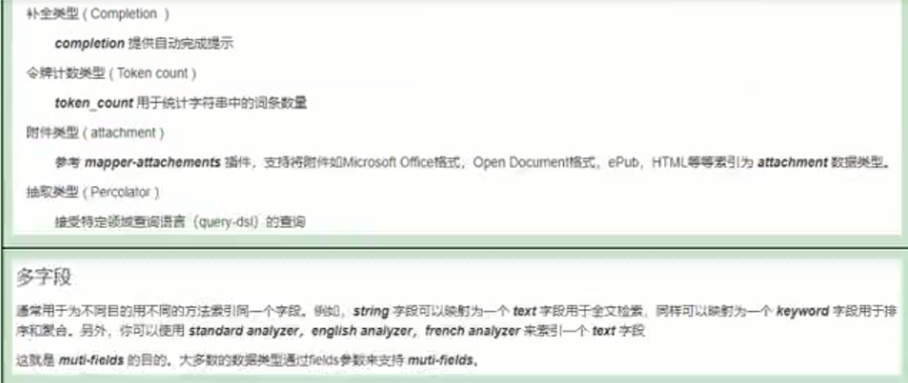
字段类型
- 核心简单域类型
- 字符串: string
- 整数 : byte, short, integer, long
- 浮点数: float, double
- 布尔型: boolean
- 日期: date
- 复合类型
- 地理类型
- 特定类型
- 多字段
映射(Mapping)
Mapping是用来定义一个文档(document),以及它所包含的属性(field)是如何存储和索引的。比如,使用Mapping来定义: - 哪些字符串属性应该被看做全文本属性。(full text fields)
- 哪些属性包含数组、日期或者地理位置。
- 文档中的所有属性是否都能被索引。(_all配置)
- 日期的格式。
- 自定义映射规则来执行动态添加属性。
- 查看mapping信息:
GET /bank/_mapping - 修改mapping信息:
https://www.elastic.co/guide/cn/elasticsearch/guide/current/mapping-intro.html
自动猜测的映射类型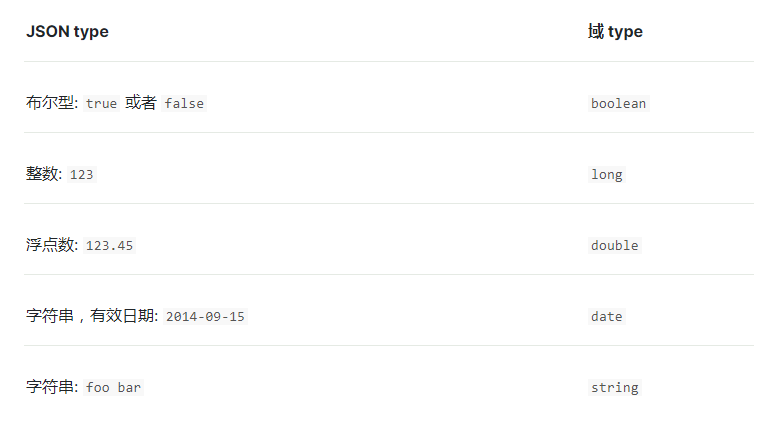
新版本改…
es7及以上移除了type的概念。
- 关系型数据库中两个数据显示是独立的,即使他们里面有相同名称的列也不影响使用,但es中不是这样的。elasticsearch是基于Lucene开发的搜索引擎,而es中不同type下名称相同的filed最终在Lucene中的处理方式是一样的。
- 两个不同type下的两个user_name,在es同一个索引下其实被认为是同一个filed,你必须在两个不同type中定义相同的filed映射。否则,不同type中的相同字段名称就会在处理中出现冲突的情况,导致Lucene处理效率下降。
- 去掉type就是为了提高es处理数据的效率。
Elasticsearch 7.x
- URL中的type参数为可选。比如,索引一个文档不再要求提供文档类型。
Elasticsearch 8.x
- 不再支持URL中的type参数。
解决:
1.将索引从多类型迁移到单类型,每种类型文档一个独立索引。
2.将已存在的索引下的数据类型,全部迁移到指定位置即可。详见数据迁移。
创建映射
1.创建索引并指定映射。
1 | GET /bank/_mapping |
添加新的字段映射
1 | PUT /my_index/_mapping |
更新映射
对于已存在的映射字段,我们不能更新。更新必须创建新的索引进行数据迁移。
1 | PUT /newbank |
数据迁移
先创建出newbank的正确映射。然后使用如下方式进行数据迁移。
1 | POST _reindex |
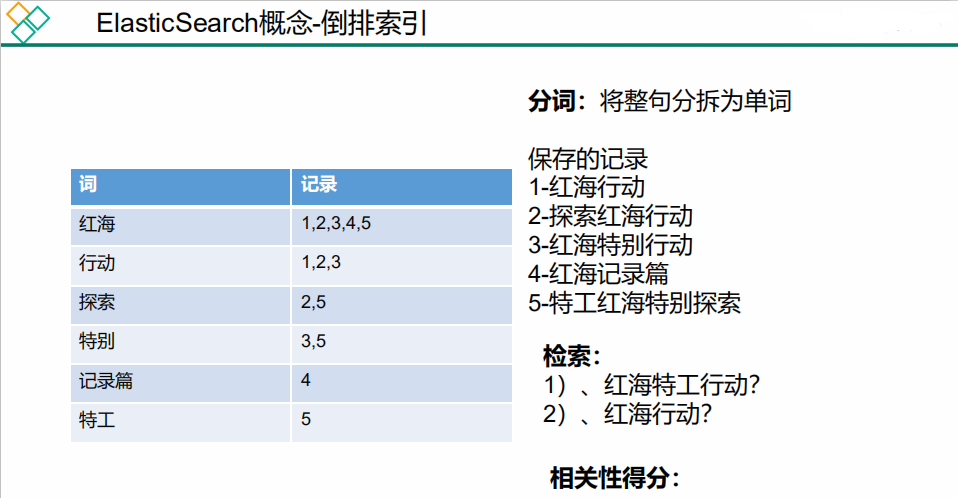
分词
一个tokenizer(分词器)接受一个字符流,将之分割为独立的tokens(词元,通常是独立的单词),然后输出tokens流。
例如,whitespace tokenizer遇到空白字符时分割文本。它会将文本”Quick brown fox!”分割为[Quick,brown,fox!]。
该tokenizer(分词器)还负责记录各个term(词条)的顺序或position位置(用于phrase短语和word proximity词近邻查询),以及term(词条)所代表的原始word(单词)的start(起始)和end(结束)的character offsets(字符偏移量)(用于高亮显示搜索的内容)。Elasticsearch提供了很多内置的分词器,可以用来构建custom analyzers(自定义分词器)。
安装ik分词器
注意:不能用默认elasticsearch-plugin install xxx.zip进行安装。
https://github.com/medcl/elasticsearch-analysis-ik/releases/tag/v7.4.2 对应es版本安装
1 | 进入es容器内部 plugins目录 |
测试分词器
1 | POST _analyze |
使用ik_smart分词器。
1 | POST _analyze |
使用ik_max_word分词器。
1 | POST _analyze |
能够看出不同的分词器,分词有明显的区别,所以以后定义一个索引不能再使用默认的mapping了,要手工建立mapping,因为要选择分词器。
自定义词库
修改/mydata/elasticsearch/plugins/ik/config/IKAnalyzer.cfg.xml
1 |
|
配置完成后重启es。测试自定义词库。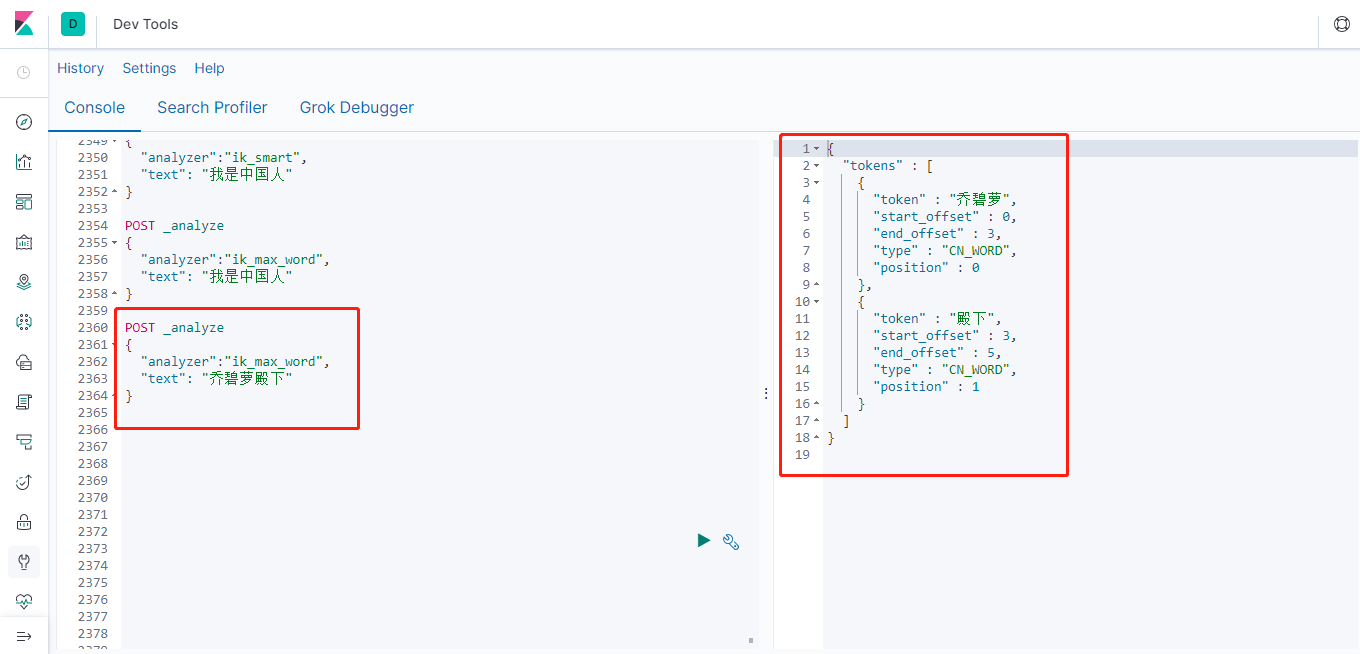
更新完成后,es只会对新增的数据用新词分词。历史数据是不会重新分词的。如果想要历史数据重写分词。只需要执行:
POST my_index/_update_by_query?conflicts=proceed
Elasticsearch-Rest-Client
(1).9300:TCP
- spring-data-elasticsearch:transport-api.jar
- springboot版本不同,transport-api.jar不同,不能适配es版本。
- 7.x已经不建议使用,8以后就要废弃。
(2).9200:HTTP
- JestClient:非官方,更新慢。
- RestTemplate:模拟发HTTP请求,ES很多操作需要自己封装,麻烦。
- HttpClient:同上。
- Elasticsearch-Rest-Client:官方RestClient,封装了ES操作,API层次分明,上手简单。
最终选择Elasticsearch-Rest-Client(elasticsearch-rest-high-level-client)
https://www.elastic.co/guide/en/elasticsearch/client/java-rest/7.x/java-rest-high.html
Spring Boot整合
配置
使用
附录-安装Nginx
- 随便启动一个nginx实例,只是为了复制出配置
- docker run -p 80:80 –name nginx -d nginx:1.10
- 将容器内的配置文件拷贝到当前目录:docker container cp nginx:/etc/nginx .
- 别忘记了后面的.
- 修改文件名称:mv nginx conf 把这个conf移动到/mydata/nginx下
- 终止原容器:docker stop nginx
- 执行命令删除原容器:docker rm $ContainerId
- 创建新的nginx:执行以下命令
1
2
3
4
5docker run -p 80:80 --name nginx \
-v /mydata/nginx/html:/usr/share/nginx/html \
-v /mydata/nginx/logs:/var/log/nginx \
-v /mydata/nginx/conf:/etc/nginx \
-d nginx:1.101
2
3
4
5
6
7
8[root@iZwz9dvddod8c7o1rqic33Z nginx]# pwd
/mydata/nginx
[root@iZwz9dvddod8c7o1rqic33Z nginx]# ls
conf html logs
[root@iZwz9dvddod8c7o1rqic33Z es]# pwd
/mydata/nginx/html/es
[root@iZwz9dvddod8c7o1rqic33Z es]# ls
fenci.txt